TIEBitmap.FillWithShape
Declaration
procedure FillWithShape(Shape: TIEShape;iWidth, iHeight: Integer;
BorderColor: TColor;
BorderWidth: Integer;
FillColor: TColor;
AlphaFill: Boolean = False;
UsePreferedAR: Boolean = True;
Margins: Integer = 0;
Opacity: Double = 1.0;
ShapeModifier: Integer = 0);
Description
Draws a TIEShape to the bitmap.| Parameter | Description |
|---|---|
| Width, Height | Size to draw the shape (the bitmap will also be resized). If -1,-1 is specified the current size is used |
| BorderColor, BorderWidth | The shape edge border. Specify clNone to skip the border, or -1 for a random color border |
| FillColor | The shape color. Specify -1 to use a random color, or -2 to keep the existing content (by drawing the shape to the background as alpha) |
| AlphaFill | If false, it gives the image a white background. If True, it uses an transparent background |
| UsePreferedAR | Some shapes look better when output at their designed aspect ratio. Disable UsePreferedAR to fill the entire image |
| Margins | Add spacing around the image |
| Opacity | Specify how opaque to draw the image (1.0 is fully opaque, 0.0 is fully transparent) |
| ShapeModifier | Optional modifier value to change the shape style (see ShapeModifier |
Note:
◼If you use FillColor = -2 to keep the existing content, the following parameters are ignored: Width, Height, BorderColor, BorderWidth, AlphaFill
◼If attached to a TImageEnView, it will automatically call Update
Demo
 | Demos\ImageEditing\EveryMethod\EveryMethod.dpr |
Examples
Also see: Automated Samples
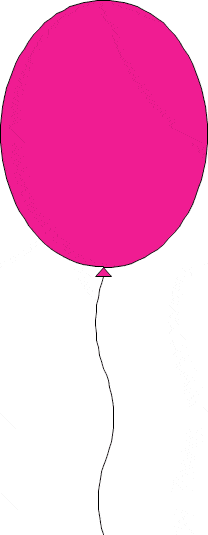
// Fill bitmap with a balloon shapeImageEnView1.IEBitmap.FillWithShape( iesBalloon, 200, 500, clBlack, 1, clMediumVioletRed, False );
// Create a shaped image by drawing to the alpha channel
ImageEnView1.IEBitmap.FillWithShape( iesRadiance, -1, -1, clNone, 0, -2, False, True );

// Create a shaped image by drawing an ImageEn shape to the alpha channel
ImageEnView1.IO.LoadFromFile( 'D:\TestImage.jpg' );


ImageEnView1.IEBitmap.FillWithShape( iesHeart, -1, -1, clNone, 0, -2 { Keep Content } );


// Enable our star stamping mode, which adds a star directly to the image wherever the user clicks
procedure Tfmain.btnAddStampClick(Sender: TObject);
const
Stamp_Border_Color = clRed;
Stamp_Border_Width = 2;
Stamp_Fill_Color = clYellow;
Stamp_Shape = iesStar5;
Stamp_Width = 50;
Stamp_Height = 50;
var
cursorBMP: TIEBitmap;
begin
// Set default style of our layer
// Note: Can also use OnNewLayer event to customize further
ImageEnView1.LayerDefaults.Clear();
ImageEnView1.LayerDefaults.Values[ IELP_BorderColor ] := ColorToString( Stamp_Border_Color );
ImageEnView1.LayerDefaults.Values[ IELP_BorderWidth ] := IntToStr( Stamp_Border_Width );
ImageEnView1.LayerDefaults.Values[ IELP_FillColor ] := ColorToString( Stamp_Fill_Color );
// Easier to use DefaultLayerShape... ImageEnView1.LayerDefaults.Values[ IELP_Shape ] := IntToStr( Ord( Stamp_Shape ));
ImageEnView1.LayerDefaults.Values[ IELP_Width ] := IntToStr( Stamp_Width );
ImageEnView1.LayerDefaults.Values[ IELP_Height ] := IntToStr( Stamp_Height );
// Enable stamp mode, and automatic merging of layers
ImageEnView1.LayerOptions := ImageEnView1.LayerOptions + [ loStampMode, loAutoMergeNewLayers ];
IEGlobalSettings().DefaultLayerShape := Stamp_Shape;
ImageEnView1.MouseInteractLayers := [ mlCreateShapeLayers ];
// Show a matching star shaped cursor
cursorBMP := TIEBitmap.Create( Stamp_Width, Stamp_Height );
try
cursorBMP.FillWithShape( Stamp_Shape, Stamp_Width, Stamp_Height, Stamp_Border_Color, Stamp_Border_Width, Stamp_Fill_Color, True, False );
ImageEnView1.SetZoneCursorBitmap( cursorBMP );
finally
cursorBMP.Free;
end;
end;
// Add Lightning Left watermark at bottom-left of image at 33% opacity
bmp := TIEBitmap.Create();
bmp.FillWithShape( Lightning Left, 50, 50, clWhite, 5, clNone, True, True );
bmp.RenderToTIEBitmapEx( ImageEnView1.IEBitmap,
ImageEnView1.IEBitmap.Width - bmp.Width - 10, DestIEViewer.IEBitmap.Height - bmp.Height - 10, bmp.Width, bmp.Height,
0, 0, bmp.Width, bmp.Height,
True, 255, rfFastLinear, ielNormal,
0.33 );
bmp.Free;
ImageEnView1.Update();
See Also
◼AdvancedDrawShape◼IEDrawShape